How to install React Native on Mac or Windows
Instructions
Version 1.5
Introduction
React Native allows developers to use web-like syntax to create mobile apps from native components for iOS and Android. Since you can't normally build iOS apps on Windows, this tutorial will focus on iOS for Mac users and Android for Windows users.
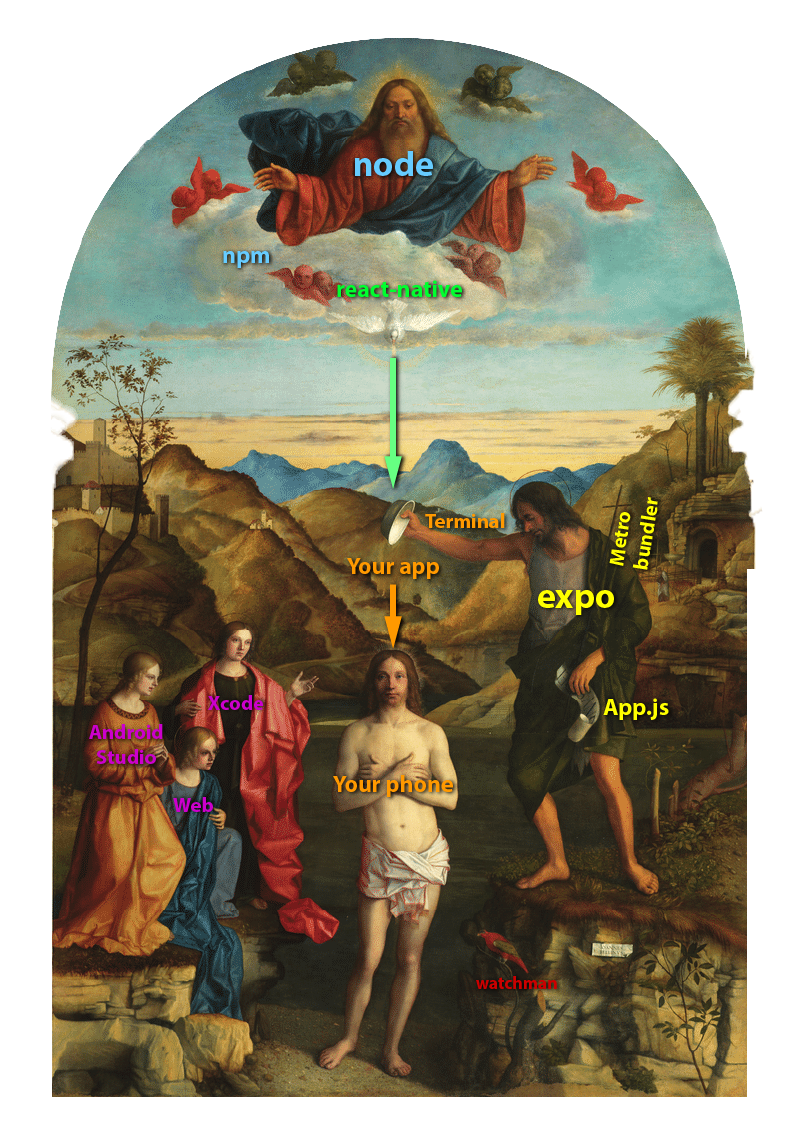
You will be using a tool called Expo that simplifies development and publication of your app, as well as letting you test directly in a special app on your physical phone. For the record, compared to the React Native CLI (Command Line Interface) approach, Expo limits the number of native libraries you can use, though you can "eject" the Expo code for more sophisticated development afterward in the React Native CLI. This diagram shows how React Native's various helpers interact.
Follow all Expo instructions below, as well as or ⚑ depending on your platform. (⚑ instructions were last tested in spring 2019 and may be outdated.)
Overview
Codecademy explanation
- Introduction
- Creating an Expo App
- Testing the App with Expo Go
- Modifying & Debugging the App
- Recap
Install support apps (30+ minutes)
Everyone
Expo Go phone app
- Install the Expo Go app on your phone from the App Store or Google Play. Also install a virtual phone simulator via the instructions below for MacOS or Windows.
- Install the Chrome browser if you don't already have it.
Visual Studio Code
Optional Visual Studio Code extensions
Clicking on extensions icon at left to search for:
- Babel JavaScript (by Michael McDermott)
Highlights JavaScript and React Native syntax.
- Prettier (by Esben Petersen)
Auto-formats indenting etc.
Doesn’t act immediately, so select Settings > Format on save.
- Color Highlight (by Sergii Naumov)
Adds borders to colors in code.
- Guides (by spywhere)
Shows indentation guidelines.
- Indent Rainbow (by oderwat)
Colors indents so you can see them clearly.
- Rainbow Brackets (by 2gua)
Helps identify matching () [] {}
- Pick a Theme
Oceanic Next works well with Babel JavaScript
List of sample themes
MacOS
required: Xcode from the App Store or Web
optional: Android Studio from the Web (see below)
- Download Xcode from the App Store
⚠️ downloading and installing Xcode can take a half hour or more. You may also need to upgrade your operating system.
- Update your MacOS if necessary
- Find and open your Terminal app for use below. You should see a prompt with your username:
marykate$
⚠️ Terminal is a powerful program, so proofread every command you type into it.
brew install watchman
⚑ Windows
Download Android Studio from the Web
- Download Android Studio (> 1 GB). Double-click to install. Select all 3 options:
* Android Studio
* Android SDK
* Android Virtual Device
- When the "Configuration Settings" dialog appears, take note of the username in the second link, eg C:\Users\MaryKate\.... Don’t change it, but remember you will need that username later.
Install Java (~10 minutes)
- Search the web for "Java JDK" and visit the Oracle website
- Navigate to the Java JDK "Java SE Development Kit" and select your operating system (probably Windows x64)
- Install.
Install NodeJS (~5 minutes)
- Search the web for "NodeJS" and download the LTS for Windows x64.
- Install Node.
Install Python 2 (~5 minutes)
- Search the web for "Python 2" and download version 2 (not 3) for Windows.
- Install Python.
Enable shell commands
- Open Settings.
- Click on Update & security.
- Click on For Developers.
- Under "Use developer features", select the Developer mode option to setup the environment to install Bash.
- On the message box, click Yes to turn on developer mode.
When instructed to type Terminal commands below:
- Click Start menu, type in "command".
- When Command Prompt appears, right-click to run it as an administrator.
- You'll see a black box appear with a prompt that reads something like C:\WINDOWS\system>.
C:\WINDOWS\system>[type your command here]
⚠️ Command Prompt is a powerful program, so proofread every command you type into it.
Create a React Native folder
Everyone
- Create a folder on your hard drive for developing your own mobile apps, eg react-native. When you use the following tools, they will generate a new subfolder inside that directory for each new app you make. ⚠️ Don't use spaces or capitals for folder and file names you create for React Native.
MacOS
- Give yourself Xcode privileges. (Enter the admin password for your computer and follow instructions to agree.)
marykate$ sudo xcodebuild -license
Install node (~5 minutes)
Everyone
marykate$ node -v
You should see something like v14.15.5. If you have an older version, follow these instructions to update node. (Jon prefers typing nvm install 14.15.5 into Terminal, where that number is the Latest Stable Release,)
Install Expo (~5 minutes)
Everyone
Install the Expo Command Line Interface
marykate$ npm install --global expo-cli
(You can upgrade by using this command and then expo upgrade.)
When done, check the version number by typing this into Terminal:
marykate$ expo --version
You should see something like 3.11.9.
Navigate to your React Native folder (~1 minute)
- You need to change the directory ("cd") in your Terminal window to the folder you made earlier. Type this at your current Terminal prompt and add a space afterward. Do not hit return yet:
marykate$ cd
Now locate the folder in your Finder, which we'll assume you called react-native. Drag its icon into the space after "cd ". You'll see something that looks like this:
marykate$ cd ~/MyStuff/react-native
Now hit enter. You should see the prompt change to something like this:
MyComputer:react-native marykate$
Initialize your React Native project (~5 minutes)
- Let's say your project will be called petfinder. Once at your React Native directory, type:
marykate$ expo init petfinder
Select the appropriate options with your arrow keys. Choose a blank managed Expo installation (without extra screens and tabs).
Wait for Expo to build your React Native project.
Launch your React Native project
Everyone
Launch Chrome
- This will provide a convenient debugging environment.
Launch React Native (~5 minutes)
- Navigate in Terminal to your petfinder directory, eg by typing this from the react-native directory:
marykate$ cd petfinder
Then, from within the petfinder directory, type:
marykate$ npm start
This should launch a packager in a new browser tab; the location bar will say "localhost" and you'll see "Metro Bundler" at top.
Wait for a message at the bottom indicating Expo has finished building the JavaScript bundle.
Either in that browser window, or back in Terminal, select a virtual simulator to show the phone on your desktop screen, or scan the QR code to show your app on your phone inside the Expo app.
Editing your project
Everyone
- Just open App.js and related files in your project directory in a code editor--eg, by dragging your project folder onto your VS Code icon--and make changes to see them on your phone!
Customizing your emulator
Everyone
To change settings on your virtual simulators
- Follow instructions below for iPhone or Android simulator.
To show the debugging menu on your phone
- Physically shake your phone and set the options, or
- Control-Command-Z (for Mac).
MacOS
To refresh your simulator:
- Command-r on your keyboard.
To show the debugging menu on your simulator:
⚑ Windows
To refresh your Android simulator:
- Double-tap R on your keyboard.
To show the debugging menu on your simulator:
To close or restart your React Native project
Everyone
- To stop Expo, navigate in Terminal to your project directory and type Control-C:
MyComputer:petfinder marykate$ ^c
Once the process is completed, type this to close the Terminal window:
MyComputer:petfinder marykate$ exit
To restart: at Terminal, navigate to the project directory and type:
MyComputer:petfinder marykate$ expo start
Debugging your emulator
Problem: Simulator shows home screen, not your app
Click and drag to the right to look for your app icon, then double-click to open it.
Problem: "No bundle URL/packager running" error
Running react-native run-ios on some Apple computers results in an error like, "No bundle URL present. Make sure you’re running a packager server or have included a .jsbundle file in your application bundle." The phone simulator isn't working, apparently because there's no packager, and the packager isn't launching in a new Terminal window, apparently because it's not recognizing node.
One solution is to install enough react-native to run the Metro bundler in one Terminal window, then open another Terminal and install node again, launching the simulator from there. Try these steps, assuming you've already installed the React Native CLI and initialized a project called, say, petfinder, and that you've quit the Terminal and Simulator.
1. Delete stale files
In Finder, navigate to your petfinder folder.
Delete petfinder/node_modules.
Delete petfinder/package-lock.json.
Open Terminal and navigate to your petfinder directory (easily done by dragging your petfinder folder onto the Terminal icon in dock).
2. Reinstall nvm, node, and dependencies
Re-install nvm (node version manager)
MyComputer:petfinder marykate$ curl -o- https://raw.githubusercontent.com/creationix/nvm/v0.33.0/install.sh | bash
When prompted, paste and run the two followup nvm commands that appear at the end; they'll look something like:
		MyComputer:petfinder marykate$ export NVM_DIR="/Users/marykate 1/.nvm"
		MyComputer:petfinder marykate$ [ -s "$NVM_DIR/nvm.sh" ] && \. "$NVM_DIR/nvm.sh"
Re-install node:
MyComputer:petfinder marykate$ nvm install 9.11.1
Re-install your dependencies:
MyComputer:petfinder marykate$ npm install
3. Start the packager
MyComputer:petfinder marykate$ react-native start
(Metro will run in this Terminal window)
4. Reinstall node in a new Terminal
In Finder, drag your petfinder folder onto Terminal in your dock to open a new window there.
MyComputer:petfinder marykate$ curl -o- https://raw.githubusercontent.com/creationix/nvm/v0.33.0/install.sh | bash
When prompted, paste and run the two followup nvm commands as before.
MyComputer:petfinder marykate$ nvm install 9.11.1
(May not be necessary.)
5. Start the simulator from the new Terminal
MyComputer:petfinder marykate$ react-native run-ios
(This takes 5 minutes--don't interact with phone until Terminal puts you back at a prompt).
With luck, you'll see the "Welcome to React Native" screen in your phone simulator!